 IoT
Beginner
IoT
Beginner
IoT Home Automation with ESP8266
Published on Jan 02, 2026
IoT
Beginner
Published on Jan 02, 2026
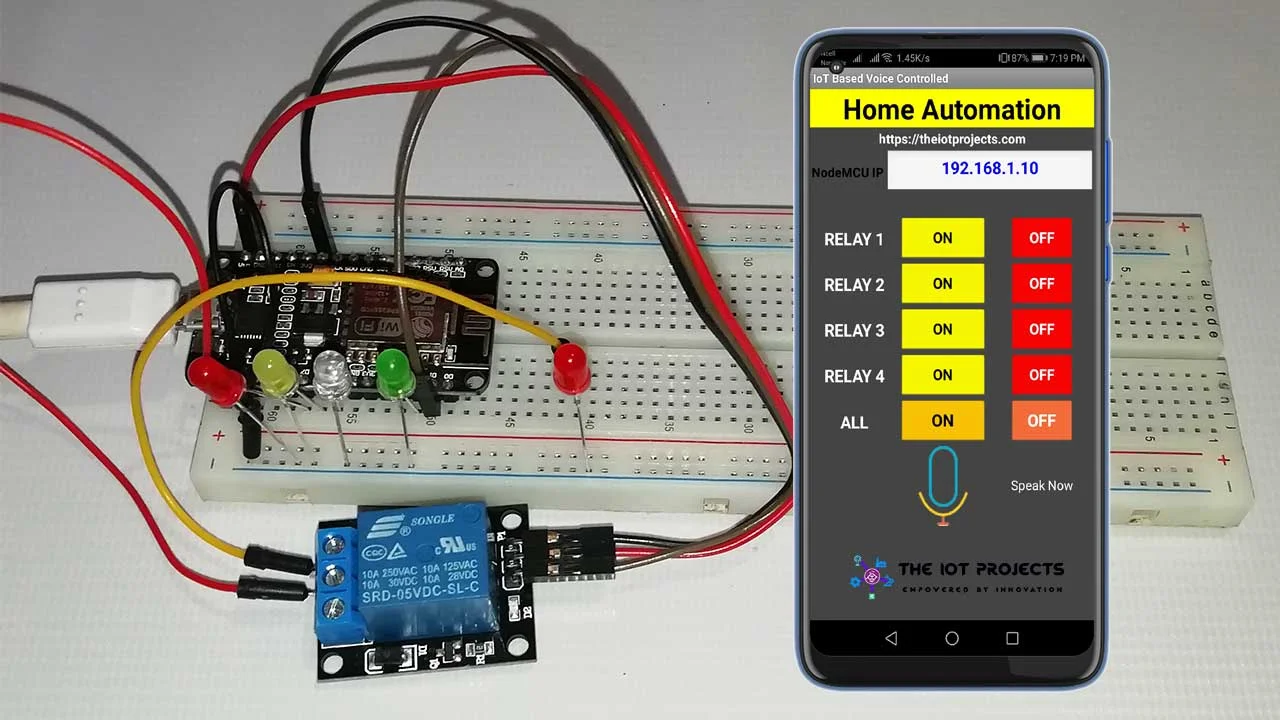
The ESP8266 is a low-cost Wi‑Fi microcontroller widely used in Internet of Things (IoT) applications. In this tutorial, you will learn how to build a simple IoT-based home automation system that allows you to control home appliances remotely over a Wi‑Fi network.
This project forms a strong foundation for smart homes, remote monitoring, and automation systems.
ESP8266 (NodeMCU or ESP-12 based board)
Relay Module (1‑channel or more)
AC Load (Bulb or appliance – for demonstration)
Jumper Wires
Breadboard
Wi‑Fi Network
The ESP8266 connects to a Wi‑Fi network and acts as a web server. When a user accesses the ESP8266’s IP address through a browser or mobile device, control commands are sent to the microcontroller.
Based on these commands, the ESP8266 switches the relay ON or OFF, thereby controlling the connected home appliance. This enables wireless control of devices from anywhere within the network.
Connect ESP8266 GPIO D1 to the Relay IN pin
Connect Relay VCC to 3.3V or 5V (depending on relay module)
Connect Relay GND to GND
Connect the appliance to the relay’s NO (Normally Open) and COM terminals
⚠️ Caution: Use proper isolation and safety precautions when working with AC loads.
Smart Home Automation
Remote Appliance Control
Energy Management Systems
Assistive and Accessibility Technologies
This project can be extended by adding mobile apps, cloud platforms, voice assistants, sensors, or multiple relays for full home automation.
Code Example
#include <ESP8266WiFi.h>

const char* ssid = "YOUR_WIFI_NAME";
const char* password = "YOUR_WIFI_PASSWORD";

WiFiServer server(80);

#define RELAY_PIN D1

void setup() {
  Serial.begin(9600);
  pinMode(RELAY_PIN, OUTPUT);
  digitalWrite(RELAY_PIN, LOW);

  WiFi.begin(ssid, password);
  while (WiFi.status() != WL_CONNECTED) {
    delay(500);
  }

  server.begin();
}

void loop() {
  WiFiClient client = server.available();
  if (!client) return;

  String request = client.readStringUntil('\r');
  client.flush();

  if (request.indexOf("/ON") != -1) {
    digitalWrite(RELAY_PIN, HIGH);
  }
  if (request.indexOf("/OFF") != -1) {
    digitalWrite(RELAY_PIN, LOW);
  }

  client.println("HTTP/1.1 200 OK");
  client.println("Content-Type: text/html");
  client.println("");
  client.println("<html><body>");
  client.println("<h2>ESP8266 Home Automation</h2>");
  client.println("<a href='/ON'><button>ON</button></a>");
  client.println("<a href='/OFF'><button>OFF</button></a>");
  client.println("</body></html>");

  delay(1);
}