 Robotics
Beginner
Robotics
Beginner
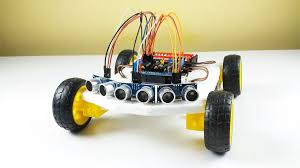
Obstacle Avoiding Robot
Published on Jan 02, 2026
Robotics
Beginner
Published on Jan 02, 2026
An obstacle avoiding robot is an autonomous mobile robot designed to detect obstacles in its path and navigate around them without human intervention. This project introduces core robotics concepts such as distance sensing, decision-making logic, and motor control.
Arduino Uno
Ultrasonic Sensor (HC-SR04)
L298N Motor Driver Module
DC Motors with Wheels
Robot Chassis
Servo Motor (optional, for sensor scanning)
Battery Pack
Jumper Wires
Breadboard (optional)
The robot uses an ultrasonic sensor to continuously measure the distance between itself and any object ahead. The Arduino triggers the sensor to send ultrasonic pulses and listens for the echo reflected by obstacles.
If no obstacle is detected within a preset distance, the robot moves forward
If an obstacle is detected, the robot stops
The robot then turns left or right to find a clear path
The Arduino processes the distance data and sends control signals to the motor driver to move the motors accordingly.
VCC → 5V
GND → GND
TRIG → Arduino Pin 6
ECHO → Arduino Pin 7
IN1 → Arduino Pin 8
IN2 → Arduino Pin 9
IN3 → Arduino Pin 10
IN4 → Arduino Pin 11
ENA & ENB → Jumper Enabled or PWM Pins
Motor terminals → DC Motors
Power input → External Battery
Autonomous Robotics
Smart Navigation Systems
Educational Robotics Projects
Research and Prototyping
This project can be enhanced by adding servo-based scanning, PID control, or wireless monitoring for smarter navigation.
Code Example
#define TRIG_PIN 6
#define ECHO_PIN 7

#define IN1 8
#define IN2 9
#define IN3 10
#define IN4 11

long duration;
int distance;

void setup() {
  pinMode(TRIG_PIN, OUTPUT);
  pinMode(ECHO_PIN, INPUT);

  pinMode(IN1, OUTPUT);
  pinMode(IN2, OUTPUT);
  pinMode(IN3, OUTPUT);
  pinMode(IN4, OUTPUT);
}

void loop() {
  distance = getDistance();

  if (distance > 20) {
    moveForward();
  } else {
    stopRobot();
    delay(300);
    turnRight();
    delay(400);
  }
}

int getDistance() {
  digitalWrite(TRIG_PIN, LOW);
  delayMicroseconds(2);
  digitalWrite(TRIG_PIN, HIGH);
  delayMicroseconds(10);
  digitalWrite(TRIG_PIN, LOW);

  duration = pulseIn(ECHO_PIN, HIGH);
  int cm = duration * 0.034 / 2;
  return cm;
}

void moveForward() {
  digitalWrite(IN1, HIGH);
  digitalWrite(IN2, LOW);
  digitalWrite(IN3, HIGH);
  digitalWrite(IN4, LOW);
}

void turnRight() {
  digitalWrite(IN1, HIGH);
  digitalWrite(IN2, LOW);
  digitalWrite(IN3, LOW);
  digitalWrite(IN4, LOW);
}

void stopRobot() {
  digitalWrite(IN1, LOW);
  digitalWrite(IN2, LOW);
  digitalWrite(IN3, LOW);
  digitalWrite(IN4, LOW);
}
Create an autonomous line following robot using IR sensors and Arduino. Learn basic robotics and sensor feedback.
Read Tutorial